
Download
Related Links
- Export List Plug-in Home Page
- Installation Instructions
- Usage Instructions
- Support and Troubleshooting
- Latest News
Purchase
| License Type: | Single User License |
| Price: | $10 USD |
Customers are Saying
Thanks for putting together export list. Been looking for this very application. Using it in conjunction with Metadata Editor to output info lists of scanned photos (you know the ones relatives give you in old boxes!!)
Export List
The Export List plugin generates reports in various formats (HTML, XML, CSV, plain text, etc.) from your photos' metadata. The Export List plugin operates in two modes:
- Exported Photos - in this mode the plugin acts as a post-processing action for export and publishing operations
- Interactive Selection - in this mode the plugin generates reports using currently selected photos
You can customize reporting options and output formatting independently for each mode. In the Interactive Selection mode you can redirect the output to a preview screen if you want to quickly copy the text to the clipboard.
Adding the post-processing action for Export and Publish operations
To add a post-processing action for Export operation, go File > Export. To add the plugin's post-processing actions to Publish operations, double-click the publish service you want.
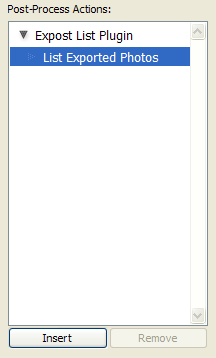
In the bottom left corner of Export and Lightroom Publishing Manager screens you will see a section titled Post-Process Actions. Locate the Export List Plugin items and double-click the List Exported Photos item underneath. Alternatively, you can select this entry and click the Insert button on the bottom. This will add the List Exported Photos section with plugin's options at the bottom of the Settings panel on the right. You may need to scroll down the Settings section to see the added section.

Generating reports on selected photos
In the Library module, select the photos you want to include in the report, then go Library > Plug-in Extras > Export List Plug-in > Inventory Selected Photos. The following screen comes up. Here you can customize your output option and specify how the generated report should be handled.

Configuring the Output
The plugin offers a number of preconfigured output templates for generating reports in various formats - plain text, CSV, HTML, XML, etc. The content of these reports can be easily customized to include the metadata fields you need - simply select a different fieldset and your report will display a different subset of metadata. The plugin comes with a few fieldset already preconfigured. You can also create your own custom fieldsets (see Customizing the Output below).
If you choose the HTML format, you can also choose a theme using the Theme menu to give your report the look-and-feel you like.
Text and HTML reports can also be grouped by one of metadata fields. For example, you can group report records by lens, ISO speed, person shown, location, etc. To specify your grouping, choose a metadata fields from the Group By menu. For your convenience, metadata fields are grouped by their primary purpose into subsets, similar to Metadata Sets on the Metadata panel in Lightroom.
Customizing the Output
You probably would want to customize your own fieldsets (for the sake of simplicy, you can thin of fieldsets as report columns). Creating and modifying your fieldsets is very easy task, since the plugin has an interactive fieldset editor. To invoke the editor, select the Customize... option from the Fieldset menu.

In the fieldset editor you have two lists containing system (pre-configured) and user fieldsets, respectively. From here you can:
- Create a new user preset from a system fieldset - select a system fieldset, customize its properties and fields, then click Save as User Preset.
- Modify one of your own presets - select a user preset, customize its properties and fields, then click Save Preset
- Create a new custom preset - click Add and customize the fieldset. Once done with customizations, click Save Preset.
- Delete a user preset - select the user fieldset you want to delete and click Delete.
You customize fieldset fields by adding items from the Available Fields list to the Fielset Fields list using < and > buttons between those lists. The drop-down menu below Available Fields gives you various metadata set choices. You can rearrange fields using Move Up and Move Down buttons below Fieldset Fields.

You can also create your own template, theme, and application presets. However, these customizations may require a bit of technical and programming experience. All customized files should be placed in the Plugins\Export List\presets directory under the Lightroom Presets folder. You can easily open this folder by clicking Show User Presets… from the Plug-in Info screen.
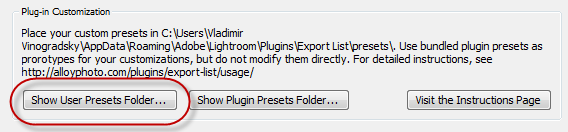
To locate original presets supplied with the plugin, click Show Plugin Presets Folder... Note, you shouldn't modify any files in the plugin presets folder - you changes will be overwritten if you install a newer version of the plugin. You are welcome to use existing presets to learn how these default presets are implemented and use them as prototypes for your custom presets.
Creating custom output templates
Templates specify the layout, formatting, and the logic of generating your reports. Templates consist of there distinctive types of content:
- static content - blocks of text that appears in the output as is
- various control structures - loops, conditional statements, that define the runtime logic of generating the output.
- placeholders - variables and expressions used by the rendering engine at runtime data to generate values and replace placeholders with actual data.
The syntax of control structures and expressions of the template engine is based on LUA – the internal scripting language of Lightroom. For the most part, you can reuse the templates provided with the plugin for building your own templates. I am going to use a simple XML template to explain how these control structures work:
<?xml version="1.0" encoding="utf-8"?>
<photos>
<l:for names="index,photo" in="ipairs(photos)">
    <photo>
<l:for names="f,field" in="ipairs(fieldset)">
        <${field.key}>${escape(photo[field.key])}</${field.key}>
</l:for>
    </photo>
</l:for>
</photos>
The template begins and ends with static content that establishes the basic structure of the XML document – the XML header and the root element named “photos”.
<?xml version="1.0" encoding="utf-8"?>
<photos>
...
</photos>
The central part of the template takes care of generating individual <photo> elements for each photo. This is a “for” loop, which iterates over the photo list and uses “index” and “photo” variables to hold the sequential index and the photo object respectively.
<l:for names="index,photo" in="ipairs(photos)">
    <photo>
    …
    </photo>
</l:for>
Child elements of every photo element are generated by the inner loop, which iterates over the fieldset selected by the use. The fieldset is simply a list of field definitions consisting of a metadata field name (key) and display title (title). We use the key names to generate child elements and obtain the value of respective photo properties.
<l:for names="f,field" in="ipairs(fieldset)">
        <${field.key}>${escape(photo[field.key])}</${field.key}>
</l:for>
The escape function provides automatic encoding of special characters (e.g. angled brackets and double quotation marks) in property values to ensure the validity of XML, HTML, and CSV elements.
Photo Fields
You can use the following metadata fields in your custom templates, fieldsets, metadata sets. All these fields can be used anywhere in the report unless specifically marked for use in the report header or footer.
System Fields
| index | Contains the number of the current photo in the export queue, starting with 1 |
| exportFileName | Contains the file name the exported photo. Available only in Export mode. |
| exportPath | Contains the full path of the exported photo. Available only in Export mode. |
| fileName | The name of the file in Lightroom catalog (for example, "IMG-6476.dng") |
| filePath | The full system path of the photo, including the file name |
| parentPath | The full system path of the photo, without the file name |
| folderPath | The volume name and the folder path of the photo as it appears in the Library module. |
| FILE_SETTINGS | Contains the formatted summary of File Settings applied during the export. For example, Format: JPEG, Quality: 0.892, Color Space: sRGB. Available only in Export mode. Intended use - in the header or footer. |
| IMAGE_SIZING | Contains the formatted summary of Image Sizing options applied during the export. For example, Resize to fit: Long Edge, 700 pixels, Resolution: 96 pixels per inch. Available only in Export mode. Intended use - in the header or footer. |
| SHARPENING_SETTINGS | Sharpening Settings applied during the export. For example, Sharpen for Matte Paper, amount: Standard. Available only in Export mode. Intended use - in the header or footer. |
Metadata Fields
These fields are populated directly from photos' metadata, as defined by Lightroom:
| keywordTags | The list of keywords as shown in the Keyword Tags panel (with Enter Keywords selected) |
| keywordTagsForExport | The list of keywords as shown in the Keyword Tags panel (with Will Export selected) |
| fileName | The leaf name of the file (for example, "myFile.jpg") |
| copyName | The name associated with this copy |
| folderName | The name of the folder the file is in |
| fileSize | The formatted size of the file (for example, "6.01 MB") |
| rating | The user rating of the file (number of stars) |
| label | The name of assigned color label |
| title | The title of photo |
| caption | The caption for photo |
| croppedDimensions | The cropped dimensions of the photo |
| dimensions | The original dimensions of file (for example, "3072 x 2304") |
| exposure | The exposure summary (for example, "1/60 sec at f/2.8") |
| shutterSpeed | The shutter speed (for example, "1/60 sec") |
| aperture | The aperture (for example, "f/2.8") |
| exposureBias | The exposure bias/compensation (for example, "-2/3 EV") |
| flash | Whether the flash fired or not (for example, "Did fire") |
| exposureProgram | The exposure program (for example, "Aperture priority") |
| meteringMode | The metering mode (for example, "Pattern") |
| isoSpeedRating | The ISO speed rating (for example, "ISO 200") |
| exposureProgram | The exposure program (for example, "Aperture priority") |
| focalLength | The focal length of lens as shot (for example, "132 mm") |
| focalLength35mm | The focal length as 35mm equivalent (for example, "211 mm") |
| lens | The lens (for example, "28.0-135.0 mm") |
| subjectDistance | The subject distance (for example, "3.98 m") |
| dateTimeOriginal | The date and time of capture (for example, "09/15/2005 17:32:50") Formatting can vary based on the user's localization settings |
| dateTimeDigitized | The date and time of scanning (for example, "09/15/2005 17:32:50") Formatting can vary based on the user's localization settings |
| dateTime | adjusted date and time (for example, "09/15/2005 17:32:50") Formatting can vary based on the user's localization settings |
| cameraMake | The camera manufacturer |
| cameraModel | The camera model |
| cameraSerialNumber | The camera serial number |
| artist | The artist's name |
| software | The software used to process/create photo |
| gps | The location of this photo (for example, "37°56'10" N 27°20'42" E") |
| gpsAltitude | The GPS altitude for this photo (for example, "82.3 m") |
| creator | The name of the person that created this image |
| creatorJobTitle | The job title of the person that created this image |
| creatorAddress | The address for the person that created this image |
| creatorCity | The city for the person that created this image |
| creatorStateProvince | The state or province for the person that created this image |
| creatorPostalCode | The postal code for the person that created this image |
| creatorCountry | The country for the person that created this image |
| creatorPhone | The phone number for the person that created this image |
| creatorEmail | The email address for the person that created this image |
| creatorUrl | The web URL for the person that created this image |
| headline | A brief, publishable synopsis or summary of the contents of this image |
| iptcSubjectCode | Values from the IPTC Subject NewsCode Controlled Vocabulary (see: http://www.newscodes.org/) |
| descriptionWriter | The name of the person who wrote, edited or corrected the description of the image |
| dateCreated | The IPTC-formatted creation date (for example, "2005-09-20T15:10:55Z") |
| intellectualGenre | A term to describe the nature of the image in terms of its intellectual or journalistic characteristics, such as daybook, or feature (examples at: http://www.newscodes.org/) |
| scene | Values from the IPTC Scene NewsCodes Controlled Vocabulary (see: http://www.newscodes.org/) |
| location | Details about a location shown in this image |
| city | The name of the city shown in this image |
| stateProvince | The name of the state shown in this image |
| country | The name of the country shown in this image |
| isoCountryCode | The 2 or 3 letter ISO 3166 Country Code of the country shown in this image |
| jobIdentifier | A number or identifier needed for workflow control or tracking |
| instructions | Information about embargoes, or other restrictions not covered by the Rights Usage field |
| provider | Name of person who should be credited when this image is published |
| source | The original owner of the copyright of this image |
| copyright | The copyright text for this image |
| rightsUsageTerms | Instructions on how this image can legally be used |
| copyrightInfoUrl | The web URL for the copyright information page |
ITCP Extension fields supported in Lightroom 3, 4, and 5
| personShown | Name of a person shown in this image. |
| nameOfOrgShown | Name of the organization or company featured in the image. |
| codeOfOrgShown | Code from a controlled vocabulary for identifying the organization or company featured in this image. |
| event | Names or describes the specific event at which the photo was taken. |
| additionalModelInfo | Information about the ethnicity and other facets of model(s) in a model-released image. |
| modelAge | Age of human model(s) at the time this image was taken in a model released image |
| minorModelAge | Age of the youngest model pictured in the image, at the time that the image was made |
| modelReleaseStatus | Summarizes the availability and scope of model releases authorizing usage of the likenesses of persons appearing in the photo |
| modelReleaseID | A PLUS-ID identifying each Model Release |
| maxAvailWidth | The maximum available width in pixels of the original photo from which this photo has been derived by downsizing |
| maxAvailHeight | The maximum available height in pixels of the original photo from which this photo has been derived by downsizing |
| sourceType | The type of the source of this digital image, selected from a controlled vocabulary |
| propertyReleaseID | A PLUS-ID identifying each Property Release |
| propertyReleaseStatus | Summarizes the availability and scope of property releases authorizing usage of the likenesses of persons appearing in the image. |
| digImageGUID | Globally unique identifier for the item, created and applied by the creator of the item at the time of its creation |
| plusVersion | The version number of the PLUS standards in place at the time of the transaction |
Special Fields
These special fields can be used in report headers and footers, or summaries.
| PHOTO_COUNT | Total number of photos on the report |
| REPORT_TIME | Current date and time, formatted in ISO format (such as "2012-10-26 9:12:34 PM") |
| REPORT_TIME_LONG | Current date and time in local long format. The exact format varies with user preferences and language settings, but is something like "December 31, 2009 9:12:34 PM". |
| REPORT_TIME_MEDIUM | Current date and time in local medium format. The exact format varies with user preferences and language settings, but is something like "Dec 31, 2009 9:12:34 PM". |
| REPORT_TIME_SHORT | Current date and time in local short format. The exact format varies with user preferences and language settings, but is something like "12/31/09 9:12 PM". |
| OUTPUT_FILE | Full path of the output file |
| PLUGIN_INFO | Plugin information string, plain text. |
| PLUGIN_INFO_HTML | Plugin information string, in HTML format. |
Customizing Output Handlers
By default the plugin uses the default application associated with the file of the generated report file. For example, the .html extension is normally associated with a web browser, so your HTML reports will open in the default web browser on your system. There is also a number of user selectable output handlers included with the plugin. You can add your own custom output handlers by creating custom presets in the apps folder under the User Presets Folder. These presets specify the command line format for invoking the application. For example, here is the handler running Mozilla Thunderbird in compose mode and putting the report in the attachment:
return {
    type  = "app",
    os = "win",
    title = "Mozilla Thunderbird",
    description = "Mozilla Thunderbird (as an e-mail attachment)",
    command = [[START /B "" "${windowsProgram("Mozilla Thunderbird/thunderbird.exe")}" -compose "to='',subject='Lightroom Export Results',body='',attachment='file:///${urlencode(OUTPUT_FILE)}'"]],
}
type – indicates that the preset is an application handler
os – specifies target operating system (“win” for Windows, “mac” – for Mac OS)
title – title as it appears in the menu
command – the command line format. You can use special functions and placeholders for system fields to indicate the path and name of the generated report file.
Functions
You would notice a couple of special functions were used in the example above:
windowsProgram( partialPath ) – this function is required to make the command line compatible with 32bit and 64bit versions Windows - takes a partial path argument and searches for that partial path first under C:\Program Files, then under C:\Program Files (x86). If the search is successul, it returns the full path of the found executable.
urlencode( fileName ) – This functions URL-encodes the text string - some applications require the name of the file to be supplied in URL-encoded form.
I hope the above gives you a starting point for modifying the default templates included with the plug-in, or even developing your own templates. If you need assistance with customizing the output to your precise specification, I can provide necessary assistance, although that would be outside the scope of standard support.