
Gallery


 Here you can find tips and tricks for using the MobileMe plug-in and find answers to frequently asked questions.
- Controlling the Sort Order on Export
- Controlling the Sort Order on Publish
- Handling Duplicate Photo Uploads
- Customizing photo titles and descriptions
- Plug-in Extras
Controlling the Sort Order on Export
By default MobileMe sorts photos in the reverse order they were added to the album, with most recent photos being placed at the beginning of the album. Apparently this was done on the assumption that you'd expect to see most recent photos first. Unfortunately, as of right now there is no option to turn this reverse sorting off, at least not through the MobileMe web interface anyway. Sure you can drag your photos around using the mouse, but this is just no fun.
With the MobileMe plug-in you can easily enforce natural ordering, so the photos appear in your MobileMe albums in the same order as in the filmstrip. Also, when you add more photos to a gallery, the new photos would go at the end of the album.
To enable this option, select the Sort photos in the order they are exported (override MobileMe sorting) option under the MobileMe Gallery Options section in the Export dialog.
Controlling the Sort Order on Publish
Version 1.21 has added the ability to control the sort order in published collections. The new functionality offers two choices:
Sorting by attribute
Sort photos by a particular attribute, e.g. "By Capture Time" or "Rating". This option is available for regular albums as well as for smart albums. To apply this type of sorting choose one of the attributes and direction (ascending or descending) when creating a new album.
To apply User Order to an existing album:
- Right click the album name in the Publish Services panel and choose Edit Album... from the pop-up menu.
- On the Edit Album screen, choose any attribute except for the User Order from the Sort Order menu.
- Choose sorting direction - ascending or descending.
- Click Edit to close the Edit Album screen and apply your sorting options.
Applying "User Order"
Arrange photos to match the "User Order" in Lightroom - this way your published collection will reflect the custom order you establish by dragging photos in the filmstrip/grid. This option is available only for regular albums (Lightroom does not support User Order for smart collections).
To apply User Order to an existing album:
- Right click the album name in the Publish Services panel and choose Edit Album... from the pop-up menu.
- On the Edit Album screen, choose User Order from the Sort Order menu.
- Click Edit to close the Edit Album screen and apply your sorting option.
Rearranging photos in the filmstrip does not immediately affect your online album.
To propagate user order to the online album:
- Right click the album name in the Publish Services panel and choose Publish Now from the pop-up menu (do not mark the album for republish).

It will be important to note that changing the the sort option from the Sort pop-up menu in the Lightroom's toolbar affects only how the photos are arranged in the filmstrip - this does not affect your online album.
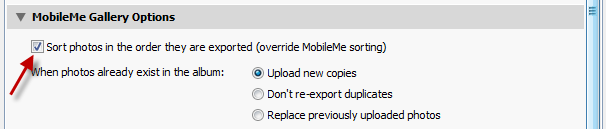
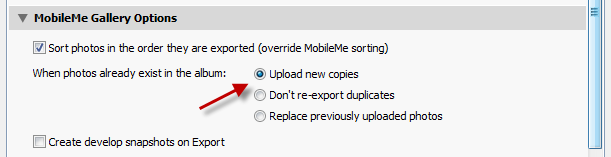
Handling Duplicate Photo Uploads
With the MobileMe plug-in you can control how to handle uploads of previously uploaded photos, especially if you are uploading to the same album. The default method is to simply re-upload all of the selected photos, which creates duplicates if any of the selected photos have been already uploaded previously. In addition, you can choose to skip previously uploaded copies (i.e not upload again), or replace existing photos with new versions.
To specify the method of handling existing photos select the appropriate choice for the When photos already exist in the album option under the MobileMe Gallery Options section in the Export dialog.
Customizing photo titles and descriptions
One of the new features added in version 1.18 is the ability to control titles and descriptions for every uploaded photo. Here I am going to explain how to configure your templates using a series of increasingly complex scenarios.
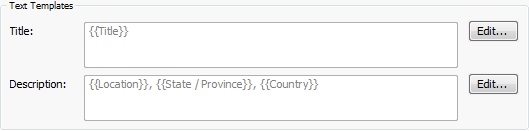
In a trivial scenario, you would want to populate photo titles from the Title metadata field, and descriptions - from the Caption metadata field.

The configuration is performed using the Text Templates section of the MobileMe Gallery Options page. Since we just want to use existing fields without utilizing any additional logic or processing, our templates should look like this:

As you can easily see, the example above exhibits one issue - the Caption metadata field contains the information that can be pulled from other metadata fields. For example, the location information should be maintained in the IPTC section, not in the Caption.
Using the templates we can simply combine multiple fields to generate descriptions for out photos on the fly by using the following templates:
On the screenshot below you can see how the photo information appears in the MobileMe Gallery after the export:

And finally, let's say we want an option of specifying a custom Caption, however pulling the location information if the caption is left blank. Using the "fallback" mechanism I implemented in my templates you can easily do that.
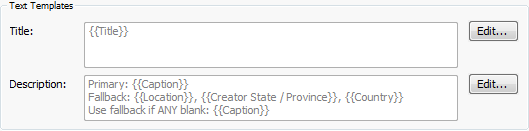
What you are seeing on the screenshot above translates into the following instruction: Populate the description from the Caption field if it is not blank, otherwise construct it from the Location, State, and Country fields.
Plug-in "Extras"
The MobileMe plug-in provides a number of features that help you maintain your albums and photos in sync between Lightroom and your online gallery. All these features are accessible via File > Plug-in Extras > MobileMe Gallery Export Plug-in Extras from Lightroom's main menu (Lightroom 3 required). If you are using multiple publish services for MobileMe, then choose the appropriate service from the Publish Service drop-down list and log in if needed:

Importing albums
This feature allows you to easily recreate in Lightroom the album structure which already exists in your online gallery. There are really no tricks, simply click Import Album Structure and after a few seconds your MobileMe Publish Service in Lightroom will be populated with album names from the online account. These albums won't have any photos, to populate them with photos you need to take the next step and associate images in your Lightroom catalog with their online counterparts.
Here is a quick example. I start with a new publish service named "MobileMe SYNC" I have just created to handle the MobileMe account I had created manually earlier:
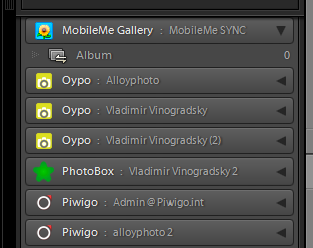
As you can see on the image on the left, initially there are no albums. After running the Import Albums Structure function I now have 2 albums in my publish service (two albums is all I had created for this demonstration).
In order to perform automatic pairing, the plug-in examines every online photo available for your account and attempts to find the best matching candidate in your catalog.
Conflict Resolution Method
Search for candidates may produce multiple positive matches. For example, when you have multiple virtual copies of the same original photo they all have identical file name. Ultimately, however, we must determine a unique candidate to associate the online photo with. This is where the guided guesswork begins, and you need to tell the plug-in which course of action to take when there are multiple matches.
- Do not import any photo - the plug-in will not attempt to resolve the conflict automatically. Multiple candidates will be added to a special collection, where you would need to resolve all conflicts manually (we'll talk about that below)
- Ignore the edit date, rely only on the refinement methods below - the plug-in will not use photos' edit times to figure out "better candidates"
- Use the most recently edited version - out of all matches, the plug-in will choose only the most recent edited photo.
- Use the last edited version before the upload- out of all matches, the plug-in will choose the photo edited last before the upload.
Note, the last two methods may still be unable to reduce the number of candidates down to one, so further refinement may still be required.
Refine Multiple Matches
These options help the matching algorithm to reduce the number of matching candidates (ideally, down to just one) using other criteria besides photo capture and edit timestamps. It seems the options below don't require additional explanation:
- Choose flagged photos over unflagged and rejected photos
- Choose photos with the highest rating
- Choose virtual copies over originals
Photo Association Quarantine
What happens when the automatic matching algorithm is unable to reduce the number of candidates down to a single "winner"? The plug-in creates a special collection and puts there all photos that require some manual intervention on your part. The name of the that "quarantine" collection starts with "※MobileMe - Photo Association Quarantine - " followed by the name of your publish service.
In my example I chose the "Do not import any photo" option to show you how the quarantine collection works.
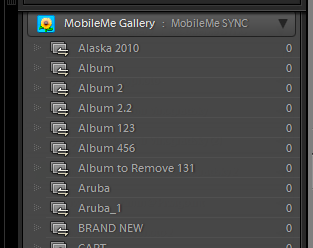
The following screenshot shows the contents of my quarantine collection:

What you need to do at this point is to remove from that collection all unwanted duplicates, reducing each photo to just one version.
Now I can run the Associate Images function again. As long as the quarantine collection exists, there will be an additional option to use photos only from that collection:

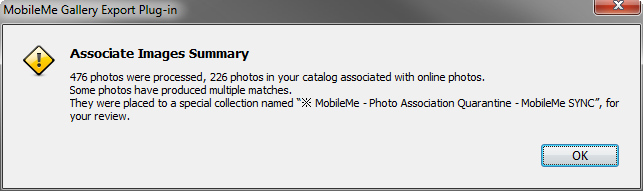
Because I have already removed all unwanted duplicates from the quarantine collection, the association is straightforward as there is only one candidate for each online photo. Now the association is successful, and the plug-in automatically removes the quarantine collection as there are no more photos that require additional input from the user.
Now all albums in my publish service are populated with photos:

Unmark to Re-Publish
This handy function allows you to return accidentally touched photos from the "Modified Photos to Re-Publish" state back to "Published" state without actually re-publishing them.
Synchronize Metadata
When you update keywords or descriptions of your photos, this function allows you to upload only the modified metadata leaving the online photo intact.
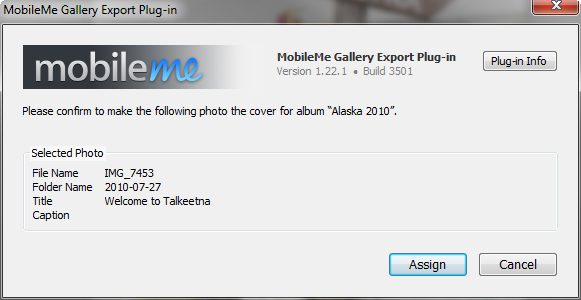
Setting album cover
Select a single album in your MobileMe publish service.
- Select a single photo in the filmstrip or in the grid.
- Go File > Plug-in Extras > MobileMe Gallery Export Plug-in Extras
- Log in to your MobileMe account if the dialog prompts you to.
- Click Set Album Cover
- Click Assign on the confirmation dialog:
Gallery


Here you can find tips and tricks for using the MobileMe plug-in and find answers to frequently asked questions.
As you can see on the image on the left, initially there are no albums. After running the Import Albums Structure function I now have 2 albums in my publish service (two albums is all I had created for this demonstration).
- Controlling the Sort Order on Export
- Controlling the Sort Order on Publish
- Handling Duplicate Photo Uploads
- Customizing photo titles and descriptions
- Plug-in Extras
Controlling the Sort Order on Export
By default MobileMe sorts photos in the reverse order they were added to the album, with most recent photos being placed at the beginning of the album. Apparently this was done on the assumption that you'd expect to see most recent photos first. Unfortunately, as of right now there is no option to turn this reverse sorting off, at least not through the MobileMe web interface anyway. Sure you can drag your photos around using the mouse, but this is just no fun. With the MobileMe plug-in you can easily enforce natural ordering, so the photos appear in your MobileMe albums in the same order as in the filmstrip. Also, when you add more photos to a gallery, the new photos would go at the end of the album. To enable this option, select the Sort photos in the order they are exported (override MobileMe sorting) option under the MobileMe Gallery Options section in the Export dialog.
Controlling the Sort Order on Publish
Version 1.21 has added the ability to control the sort order in published collections. The new functionality offers two choices:Sorting by attribute
Sort photos by a particular attribute, e.g. "By Capture Time" or "Rating". This option is available for regular albums as well as for smart albums. To apply this type of sorting choose one of the attributes and direction (ascending or descending) when creating a new album. To apply User Order to an existing album:- Right click the album name in the Publish Services panel and choose Edit Album... from the pop-up menu.
- On the Edit Album screen, choose any attribute except for the User Order from the Sort Order menu.
- Choose sorting direction - ascending or descending.
- Click Edit to close the Edit Album screen and apply your sorting options.
Applying "User Order"
Arrange photos to match the "User Order" in Lightroom - this way your published collection will reflect the custom order you establish by dragging photos in the filmstrip/grid. This option is available only for regular albums (Lightroom does not support User Order for smart collections). To apply User Order to an existing album:- Right click the album name in the Publish Services panel and choose Edit Album... from the pop-up menu.
- On the Edit Album screen, choose User Order from the Sort Order menu.
- Click Edit to close the Edit Album screen and apply your sorting option.
- Right click the album name in the Publish Services panel and choose Publish Now from the pop-up menu (do not mark the album for republish).
Handling Duplicate Photo Uploads
With the MobileMe plug-in you can control how to handle uploads of previously uploaded photos, especially if you are uploading to the same album. The default method is to simply re-upload all of the selected photos, which creates duplicates if any of the selected photos have been already uploaded previously. In addition, you can choose to skip previously uploaded copies (i.e not upload again), or replace existing photos with new versions. To specify the method of handling existing photos select the appropriate choice for the When photos already exist in the album option under the MobileMe Gallery Options section in the Export dialog.
Customizing photo titles and descriptions
One of the new features added in version 1.18 is the ability to control titles and descriptions for every uploaded photo. Here I am going to explain how to configure your templates using a series of increasingly complex scenarios. In a trivial scenario, you would want to populate photo titles from the Title metadata field, and descriptions - from the Caption metadata field.
Plug-in "Extras"
The MobileMe plug-in provides a number of features that help you maintain your albums and photos in sync between Lightroom and your online gallery. All these features are accessible via File > Plug-in Extras > MobileMe Gallery Export Plug-in Extras from Lightroom's main menu (Lightroom 3 required). If you are using multiple publish services for MobileMe, then choose the appropriate service from the Publish Service drop-down list and log in if needed:
Importing albums
This feature allows you to easily recreate in Lightroom the album structure which already exists in your online gallery. There are really no tricks, simply click Import Album Structure and after a few seconds your MobileMe Publish Service in Lightroom will be populated with album names from the online account. These albums won't have any photos, to populate them with photos you need to take the next step and associate images in your Lightroom catalog with their online counterparts. Here is a quick example. I start with a new publish service named "MobileMe SYNC" I have just created to handle the MobileMe account I had created manually earlier: |
|
In order to perform automatic pairing, the plug-in examines every online photo available for your account and attempts to find the best matching candidate in your catalog.
Conflict Resolution Method
Search for candidates may produce multiple positive matches. For example, when you have multiple virtual copies of the same original photo they all have identical file name. Ultimately, however, we must determine a unique candidate to associate the online photo with. This is where the guided guesswork begins, and you need to tell the plug-in which course of action to take when there are multiple matches.- Do not import any photo - the plug-in will not attempt to resolve the conflict automatically. Multiple candidates will be added to a special collection, where you would need to resolve all conflicts manually (we'll talk about that below)
- Ignore the edit date, rely only on the refinement methods below - the plug-in will not use photos' edit times to figure out "better candidates"
- Use the most recently edited version - out of all matches, the plug-in will choose only the most recent edited photo.
- Use the last edited version before the upload- out of all matches, the plug-in will choose the photo edited last before the upload.
Refine Multiple Matches
These options help the matching algorithm to reduce the number of matching candidates (ideally, down to just one) using other criteria besides photo capture and edit timestamps. It seems the options below don't require additional explanation:- Choose flagged photos over unflagged and rejected photos
- Choose photos with the highest rating
- Choose virtual copies over originals
Photo Association Quarantine
What happens when the automatic matching algorithm is unable to reduce the number of candidates down to a single "winner"? The plug-in creates a special collection and puts there all photos that require some manual intervention on your part. The name of the that "quarantine" collection starts with "※MobileMe - Photo Association Quarantine - " followed by the name of your publish service. In my example I chose the "Do not import any photo" option to show you how the quarantine collection works.
What you need to do at this point is to remove from that collection all unwanted duplicates, reducing each photo to just one version.
Now I can run the Associate Images function again. As long as the quarantine collection exists, there will be an additional option to use photos only from that collection:
Unmark to Re-Publish
This handy function allows you to return accidentally touched photos from the "Modified Photos to Re-Publish" state back to "Published" state without actually re-publishing them.Synchronize Metadata
When you update keywords or descriptions of your photos, this function allows you to upload only the modified metadata leaving the online photo intact.Setting album cover
Select a single album in your MobileMe publish service.- Select a single photo in the filmstrip or in the grid.
- Go File > Plug-in Extras > MobileMe Gallery Export Plug-in Extras
- Log in to your MobileMe account if the dialog prompts you to.
- Click Set Album Cover
- Click Assign on the confirmation dialog: