
Download
Related Links
- Photobox Plug-in Home Page
- Purchase and Registration
- Installation Instructions
- Usage
- Support and Troubleshooting
- Latest News
Purchase
| License Type: | Single User License |
| Price: | $15 USD |
Customers are Saying
The Photobox Plugin is a great timesaver, before I got it I had to export jpgs to a folder then go into the Photobox website and upload into an album from there. Now I just use the Lightroom export dialog to select the Plugin, set a few parameters and off they go. This has really streamlined my workflow and is well worth the money.
— Peter Stokes
ᴥ
PhotoBox
Usage
The Export facility works the same way in Lightroom 2 and Lightroom 3.- Select the pictures you want to upload.
- Go to File | Export (or press Ctrl+Shift+E /Cmd+Shift+E ), and select the plug-in name from the Export To drop-down list. The control panel of the plug-in will appear in the main section of the Export window.
- In the Your Account section, enter your username and password, click Log in. If the online service accepts your credentials, a message "You are logged in as username" will appear at the bottom of the Your Account section.

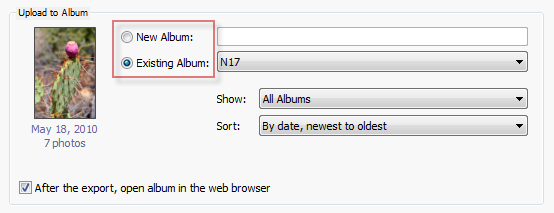
- In the Upload to Album section, specify the album to upload your photos to. You can do one of the following:
- Create a new album by clicking the New Album option and typing in a name for the new album.
- Select one of your existing albums by clicking the Existing Album option and choosing an album name from the drop-down list. Using the Show Albums and Sort Albums options, you can limit album choices and sort album names in the list, respectively.
- If you are uploading to an existing album, scroll down a little to the Export Options section and specify how to handle duplicate uploads. You can choose to upload new copies (even if that creates duplicate photos in the album), skip photos that already exist in the album, or replace older duplicates with new copies.

- Specify additional options, such as File Naming, File Settings, Image Sizing, etc. - that is all Lightroom standard stuff, common for most export operations.
- Now click Export and wait for Lightroom to render and upload your photos. If you kept the After the export, open album in the web browser option checked, the web browser will start automatically and open your album page. Note, you might need to log in before you can actually access the album page.